Introduction
Many commuters rely on compact true‑wireless earbuds for daily calls, music, and podcasts. Over time, battery capacity diminishes and dust accumulates in charging ports and speaker meshes, leading to reduced playback time, intermittent charging, or muffled audio. This guide explains how to replace earbud batteries and perform a comprehensive cleaning and repair using readily available tools. By following each step, the reader will extend the lifespan of expensive earbuds, avoid costly service fees, and regain the original sound quality that first attracted them to the device.
What You’ll Need
- Precision screwdriver set (typically a tiny Phillips or Pentalobe)
- Small tweezers for handling delicate components
- Replacement earbud batteries compatible with the specific model
- Cleaning tools to remove lint, dust, and earwax from ports and speaker meshes
- Anti‑static mat or clean workspace
For the cleaning portion, the following products are highly effective and have been positively reviewed by thousands of users:
- STIKKI Cleaning Kit – $15.95, 4.3/5 stars (8,628 reviews)
- JM.JEEMI AirPods Cleaner Pen – $7.99, 4.8/5 stars (6 reviews)
- Ordilend iPhone & AirPods Cleaning Kit – $15.99, 4.2/5 stars (2,079 reviews)
Step 1: Gather Tools and Prepare the Workspace
The first step is to create a static‑free environment where tiny components will not be lost. One should lay an anti‑static mat on a clean desk and arrange all tools within easy reach. The precision screwdriver set will be required to open the earbud housing without damaging the plastic seams. Small tweezers will assist in extracting the old battery and positioning the new one. At this stage, it is advisable to have the STIKKI Cleaning Kit nearby, because the putty can quickly absorb any stray dust that settles on the work surface.
The STIKKI kit includes a non‑sticky cleaning putty, several precision picks, and a soft brush. Its non‑toxic formulation leaves no residue, making it safe for delicate electronics. Users have reported up to 96 uses per kit, providing excellent value for repeated maintenance tasks.
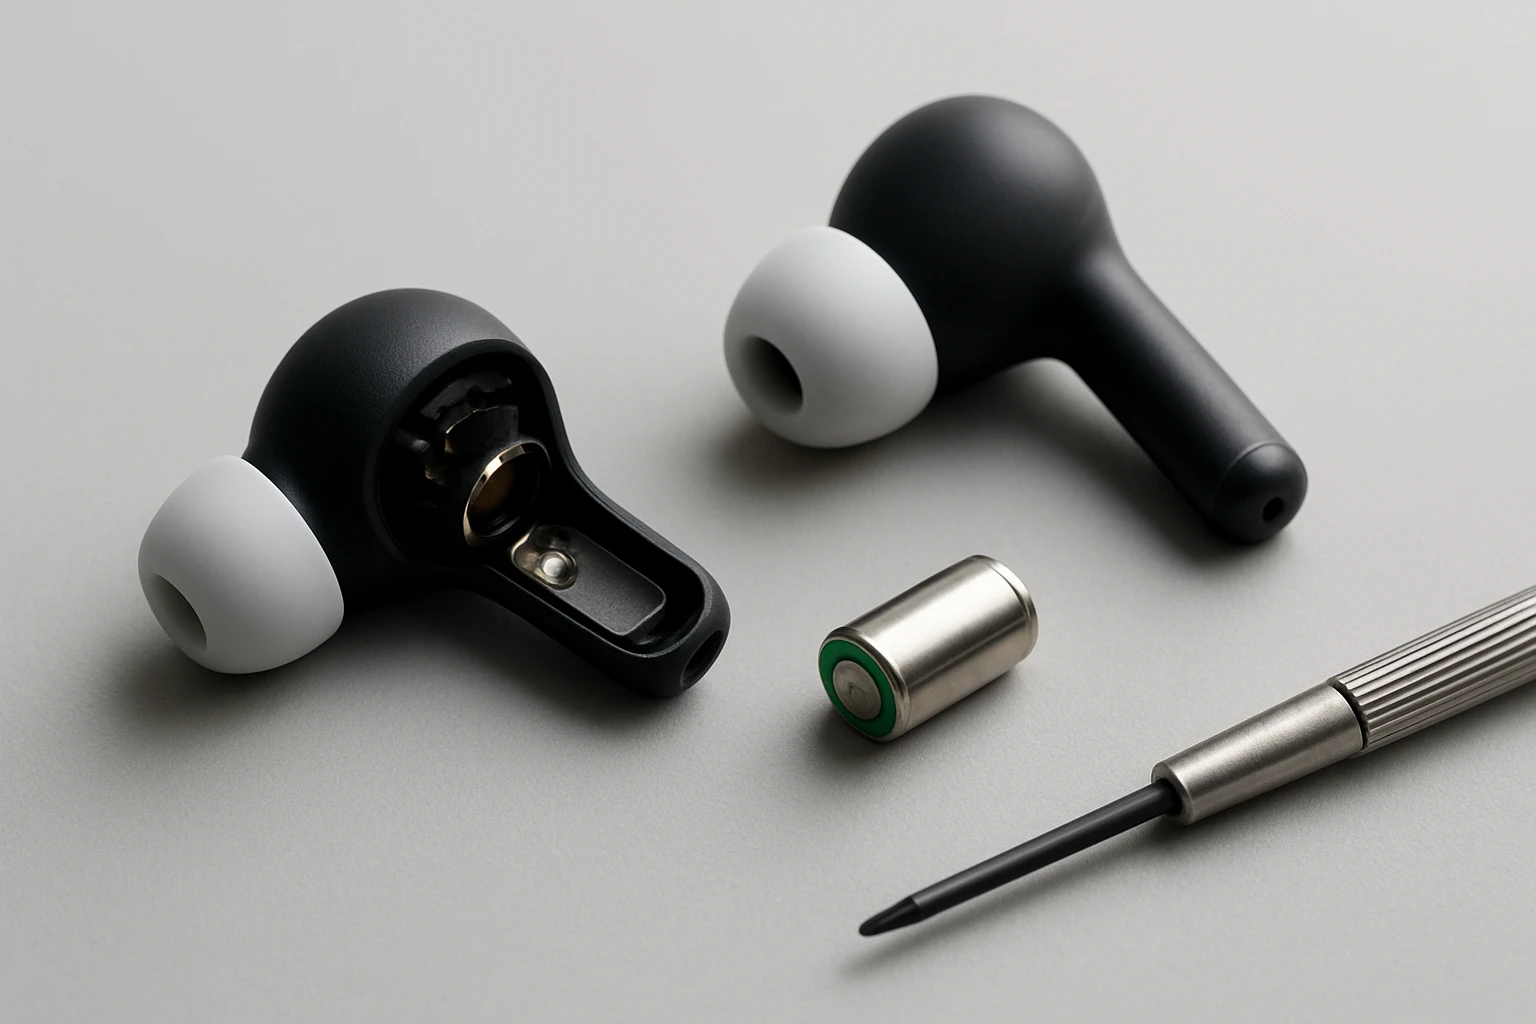
Step 2: Disassemble the Earbud
Using the appropriate screwdriver, carefully remove the outer shell of the earbud. Many commuter models have a hidden screw beneath a small rubber or silicone cover; gently pry the cover with a fingernail or a plastic opening tool. Once the screw is exposed, unscrew it clockwise until the housing separates. It is crucial to apply even pressure to avoid cracking the plastic.
After the shell is opened, use the precision pick from the STIKKI kit to lift any adhesive strips that hold the internal components in place. The pick’s fine tip allows for controlled removal without scratching the internal circuitry. If the earbud includes a silicone seal, the soft brush from the same kit can loosen it without tearing.
Step 3: Remove the Old Battery
Inside the earbud, the battery is typically a thin lithium‑polymer cell soldered to a tiny contact pad. Use the tweezers to gently grip the edge of the battery and lift it away from the pad. If the battery is soldered, a low‑temperature soldering iron with a fine tip may be required; however, many commuter earbuds use a plug‑in battery that can be pulled out without heat.
Before discarding the old cell, inspect it for swelling or leakage. A swollen battery indicates a safety hazard and must be disposed of according to local regulations. The removal process should be performed slowly to avoid bending the contact pads, which could cause intermittent charging later.
Step 4: Clean the Internal Contacts
Dust, lint, and earwax often accumulate on the charging contacts and speaker mesh, leading to poor audio output and charging failures. At this point, the JM.JEEMI AirPods Cleaner Pen becomes invaluable. Its high‑density soft bristles are engineered to reach mesh holes as small as 0.3 mm without damaging the delicate driver membrane. The metal tip, rounded for safety, can clear lint from the charging port without scratching the metal contacts.
To clean, press the brush gently against the speaker grill and sweep in a short, controlled motion. Then, switch to the metal tip and insert it into the charging port at a low angle, dragging any visible debris toward the opening. The pen’s compact 4.3‑inch collapsed length makes it easy to maneuver inside the confined earbud cavity.
For larger ports or the charging case, the Ordilend iPhone & AirPods Cleaning Kit offers a set of U‑shaped brushes and a port pick that can reach deeper crevices. Its sturdy ABS plastic construction ensures the tools do not break under pressure, and the included microfiber cloth can wipe away any remaining residue.
Step 5: Install the New Battery
Place the replacement battery into the cavity, aligning the positive and negative terminals with the corresponding pads. If the new battery includes a connector, gently press it onto the pad until a firm click is felt. For soldered batteries, a brief soldering operation may be necessary; use a fine‑tip iron set to no more than 300 °C to avoid damaging nearby components.
After the battery is seated, verify that the contacts are clean and free of oxidation. The cleaning putty from the STIKKI kit can be pressed lightly onto the pads to absorb any microscopic particles that may have settled during handling. This step ensures optimal electrical conductivity.
Once the battery is secured, re‑attach any silicone seals using the soft brush to ensure a proper seal against moisture.
Step 6: Reassemble and Test the Earbuds
Align the two halves of the earbud housing and press them together until the clips snap into place. Re‑insert the screw and tighten it just enough to hold the shell without over‑compressing the internal components. It is advisable to test the earbuds before fully closing the case.
Place the earbud in its charging case and connect the case to a power source. Observe whether the indicator light shows a charging status. Play a short audio clip to confirm that sound quality has returned to its original clarity. If the audio remains muffled, repeat the cleaning step with the JM.JEEMI pen to ensure all mesh debris has been removed.
Tips & Pro Tips
- Work in a well‑lit area; a magnifying lamp can reveal tiny particles that are otherwise invisible.
- Keep a small container nearby to store removed screws; losing a single screw can render reassembly impossible.
- When using the cleaning putty, press only lightly; excessive force can embed the putty into crevices.
- Do not use liquids on the internal components; dry tools are sufficient for most debris removal.
- If the earbud case itself shows signs of corrosion, apply a tiny amount of isopropyl alcohol with a cotton swab, then let it dry completely before use.
Troubleshooting
Problem: Earbud does not charge after reassembly.
Solution: Verify that the charging contacts are free of lint. Use the metal tip of the JM.JEEMI pen to gently scrape any remaining particles. Also, confirm that the battery connector is fully seated.
Problem: Audio remains muffled despite cleaning.
Solution: Inspect the speaker mesh for compressed wax that may require a longer cleaning session. The high‑density brush can be used repeatedly, rotating the earbud to expose different angles.
Problem: Battery drains quickly after replacement.
Solution: Ensure the replacement battery is from a reputable source and matches the original specifications. A mismatched voltage can cause rapid discharge.
Conclusion
By following the systematic approach outlined above, one can replace earbud batteries, clean internal contacts, and restore full functionality to commuter earbuds without professional assistance. The combination of precision tools and specialized cleaning kits—such as the STIKKI Cleaning Kit, JM.JEEMI AirPods Cleaner Pen, and Ordilend iPhone & AirPods Cleaning Kit—provides a reliable, cost‑effective solution for maintaining high‑performance audio devices. Regular maintenance using these tools will prolong the lifespan of earbuds, reduce the need for replacements, and ensure consistent audio quality for daily commutes.
Products Mentioned in This Guide
Frequently Asked Questions
Can I replace the battery in any true‑wireless earbud model?
Most true‑wireless earbuds have sealed housings, so battery replacement is only feasible for models with a removable back or documented repair guides.
What tools are essential for safely opening earbuds?
A precision screwdriver set (Phillips or Pentalobe), small tweezers, and an anti‑static mat are the minimum tools needed.
How do I clean dust and earwax from the charging contacts?
Use a soft brush or a lint‑free swab lightly dampened with isopropyl alcohol, then let the contacts dry before reassembly.
Is it safe to use third‑party replacement batteries?
Yes, as long as the voltage and capacity match the original specifications; otherwise you risk reduced performance or damage.
Will replacing the battery restore the original playback time?
A new, correctly rated battery should return the earbuds to their advertised runtime, assuming the rest of the hardware is in good condition.